By using this website, you agree to our use of cookies (needed to provide our website’s features) and our Terms of Use.
By: Andrew Forrest - July 2024
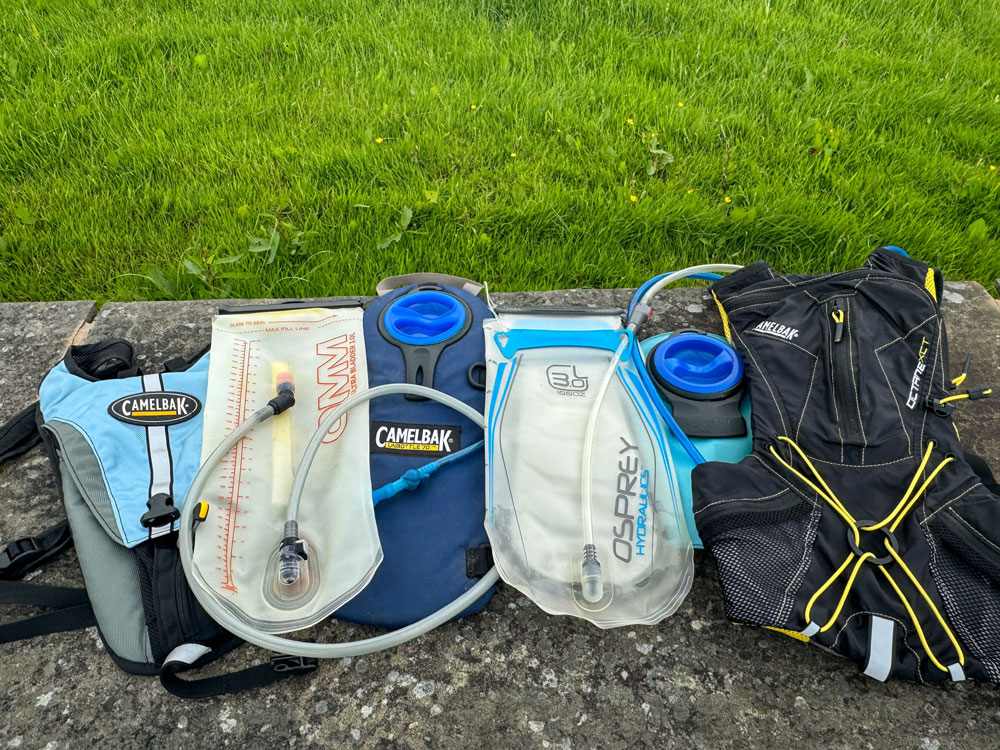
In this article, we will discuss the best hydration bladders of 2025, why you should use them, and the many factors to consider when choosing them. So, let's get started on this refreshing journey!
As outdoor enthusiasts, we know the importance of staying hydrated while hiking or exploring the great outdoors. Whether walking, hiking, biking, or running, easy access to water is crucial for a safe and enjoyable experience. However, carrying a water bottle can be cumbersome and inconvenient. Enter the hydration bladder, the game-changing solution for hands-free hydration on the go.
This page contains affiliate links. If you buy products or services via these links, we may earn a small commission at no cost to you. If you are thinking of buying, please use our links, as it helps support our website and YouTube channel.
The Osprey Hydraulics hydration bladder is an excellent all-rounder. It is durable, very easy to use, and packed full of features. The one that I use weekly is now in its fourth year of use with no issues at all.

 |
 |
 |
|

|
|
|
|
Specs:
Features:
Pros:
Cons:
Description:
The Osprey Hydraulics reservoirs have recently been updated, and I have reviewed that version here. The four-year-old reservoir I use every week is still widely available and has over 5,000 4.6-star average reviews on Amazon, so they must be doing something right! It is cheaper than the latest version, but the latest version does include the easy pour handle, an on/off switch on the valve, and a slightly reduced backplate.
You open and close the bladder using a very easy-to-use sliding closure. I prefer sliders to screw-tops as I find the wide opening they create makes them a lot easier to fill, empty, and clean. This water reservoir also includes a pouring shield, which makes for accurate filling of other vessels if you are pouring water out of it.
The bite valve is easy to use and suck from when putting it in your mouth, and I found it provided smooth, plentiful water delivery without having to suck too hard. On this new model, there is also an on/off twist lock system that your thumb can efficiently operate to prevent the valve from leaking, but after four years of continued use of the old version, I have never had any leaks.
The stiff backplate provides extra protection and durability and gives the reservoir stability, so it easily slides into the various backpacks I have put it in. In my Osprey Talon 33 Daysack, there is a hydration slot that the reservoir just slots into, keeping it away from the main pack. A slight downside is the backplate adds a little weight, but as you can see from the table I put together below, the fluid weighs far more than the hydration bladder, so you won't notice too much of a difference in overall weight.

Rigid back on the back of a hydration bladder

Hydration slot on Osprey backpack
Suppose you like these Osprey packs and features and would prefer something more lightweight. In that case, they do a very similar bladder with less of a backplate (they use a couple of baffles), which reduces the weight in their Hydraulics LT Reservoirs, which are available in 1.5 litre and 2.5 litre sizes. These should then fit into most backpacks or hydration packs.
Just like my version, the LTs have been around for a while. The big-selling previous versions of the 1.5 litre and 2.5 litre are still for sale and are often found cheaper than the newer version.
Besides the opening, the feature I liked the most is the QuickConnect system, which allows the reservoir to be uncoupled, so you can take it out, refill it, or simply check what you have left without disconnecting the rest of the hose from the backpack. The big plus with this Osprey one is that the QuickConnect system is at the top of the bladder, whereas many are at the bottom. This means it is easy to unclip without digging into your backpack or hydration pack to undo it.
If you are adding energy powders or hydration tablets to the water, the reservoir has litre markings so you can work out how much you need to add. The new model also has a practical carry handle, allowing one-handed filling.
Also included is a magnetic sternum buckle and slider, so you can effectively attach the end of the tube across your chest to stop it from flapping around while walking. If you do use them, just be conscious that magnets can affect compass readings if you use a compass - so keep them well apart! In the main, I don't use this as I feed the hose down my rucksack straps, but some people may find this useful.
Overall, I cannot really fault this system, which is easy to use, fill and drink from and is still going strong after four years of continued use. Osprey sells a wide range of spares and cleaning accessories for their products, although some of the more generic cleaning equipment does a similar job and can often be found a little cheaper.
If weight is your primary concern whilst hiking, you cannot beat this HydraPak Shape Shift reservoir. Whilst not having all the features of the Osprey Hydraulics water bladder, it is not far off, with a slide-seal easy opening, plug-n-play easy connect system, and it is fully reversible for easy cleaning (even in a dishwasher), and all this at only 154 g for the 3-litre capacity water reservoir. With that said, as I have stated below, the weight of the fluid generally far outweighs the water bladder weight.

|
|
Specs:
Features:
Pros:
Cons:
Description:
This lightweight, durable water bladder fits nicely into most backpacks or hydration packs and is fully reversible, which makes cleaning a breeze. The plug-and-play system was straightforward to use, so the reservoir could easily be detached from the tube without having to undo the tube from your rucksack or hydration pack.
The slider opening worked well to allow for easy filling, but it wasn't as easy to hold open whilst it filled as some of the others, and if transferring liquid out, it wasn't as easy to pour.
It is, though, the lightest on this list whilst still being very durable. It is also stable in use, as long as you can get the middle baffles fastened - my clumsy hands did have a little trouble at first. The baffle is sort of like a zip-lock closure. The baffle reduces sloshing but can be unlocked to disperse the weight more evenly. The wide opening and construction allow it to be fully reversed, making cleaning easy. Following the manufacturer's instructions, you can put it in a dishwasher.
Putting the bite valve in your mouth allows for easy sucking and drinking and self-seals after each sip. There is also a twist on/off bar to prevent leaks, although I didn't use that or notice any leaks.
They say it can be frozen (as most can), and you can fill it with hot water up to 60° C, should you need to. I only ever tested with cold water, although on warmer days, I also added ice cubes. There are volume markings on the side so you can see how much you are taking or have left, and they are also helpful if you mix powders or electrolyte tablets into your water.
Overall, it is an easy-to-use, lightweight and durable water bladder.
Whilst you can use these for carrying water whilst hiking, because of their size and fewer features, they are more suited for use whilst camping, so that you can carry larger volumes of water around without the weight. Whilst the Dromlite Bags are available in 2-litre, 4-litre and 6-litre sizes, for a little extra weight, if you need additional volume, you can use the Dromedary bags that are available in 4-litre, 6-litre and 10-litre sizes.

|
|


|
|

Specs:
Features:
Dromlite Bags
Dromedary Bags
Pros:
Cons:
Description:
Dromlite and Dromedary bags offer large-capacity water storage that are completely collapsible, so they take up very little space in your backpack. The larger Dromedary bags are very heavy-duty, with an abrasion-resistant 1,000D fabric outer that is laminated with a food-grade BPA-free polyurethane inner. A perimeter webbing around it allows for easy carrying, and the low-profile cap is used for filling, drinking, and pouring.
The Dromlite bags, whilst not as durable as the Dromedary ones, are still durable and collapse to the cap size for carrying. A loop at the top allows for easy hanging or storage, and they are lightweight.
Overall, these water storage carriers are lightweight and great for camping, and if you combine them with the right attachments, you could even set up a shower!
Camelbak's were the first hydration packs I used when moving away from water bottles in the early 2000s. They have produced many versions over the years, and the Crux was launched in 2016, and I used it for many hikes before moving over to a slider rather than a screw top.
There are pros and cons to both screw-tops and sliders and if your hydration bladder of choice is a screw-top, you can't go far wrong with the Camelbak Crux. It is very durable, has a higher level of water flow than most, and is easy to fill and care for with its very wide screw-top.

| All sizes: | |
|
|
| 2 Litre: | |
 |
|
 |
|
| 3 Litre: | |
|
|

Specs:
Features:
Pros:
Cons:
Description:
If you prefer screw tops, then the Camelbak Crux would be the one to choose. It has been redesigned, and if you watch any of their online videos, it is more durable than ever. The larger diameter hose now allows for a faster flow rate, equating to putting 20% more water per sip in your mouth. While I can't verify the exact increase, it feels like it releases more fluid on each sip to keep me hydrated. The bite valve itself self-seals after each drink.
The handle helps with filling the water reservoir up at various water sources, and the wide screw top aids that. In all my testing, I never found the screwtop to leak, which I previously had with screw-top water reservoirs. The screw-top 'leak-proof' cap is easier to open and close than previous versions. It is 46 x 23 x 6 cm for the 3-litre version, so it fits most medium-sized upwards hydration packs and backpacks. The 1.5-litre and 2-litre versions can be used in smaller hydration packs.
It has its own Quick Link system, which also prevents leakage when the tube is disconnected, when refilling, or when removing components when cleaning. There are half-litre measurement increments on the outside, so you can see how much liquid you have left or use the measurements when adding energy powders or hydration tablets. A baffle down the middle helps create a low-profile fit, so it takes up less space in your hydration pack.
Overall, in my opinion, it is the best screw-top hydration bladder around and a great allrounder in terms of ease of use and durability. For something slightly different, the Camelbak Crux is also available in a lumbar version, where the reservoir shape is different from the rest, so the water sits lower and gives your hydration pack or backpack a lower centre of gravity to help with stability. Due to the teardrop shape of many hydration packs, the Camelbak Crux may not fit in them, but it should fit most backpacks.
You may ask why you need an insulated hydration system, but they can be very useful. They can help stop your water from freezing if you are hiking in freezing weather in the winter and can help keep your water cooler for longer when walking in the heat in summer. The main downsides are that insulated hydration bladders take up a little more space and weigh a bit more because of the insulation. Of the ones I tested, there was one clear winner for me: the HydraPak hydrasleeve hydration pack.

|
|

Specs:
Features:
Pros:
Cons:
Description:
As the name implies, the Hydrapak Hydrasleeve includes an insulated sleeve and tube and a removable shapeshift hydration bladder. The insulated sleeve is constructed from insulating foam and a reflective liner. While I did most of the testing with the accompanying HydraPak reservoir, you can remove it and potentially use it with others you may own, which I did.
I did some hiking in the Alps earlier this year, some in very cold, windy conditions. Whilst the temperatures were below freezing, the water inside never froze. I had the pack inside my backpack, which provided additional insulation. As I've learnt over many cold winters in the UK, if you keep taking regular small sips, it keeps the water moving along the tube and helps stop it from freezing.
Whilst we haven't had the greatest summer so far in terms of warmth, well, certainly here in the Northwest of England, I've taken this hydration pack out on several occasions on hotter days, along with my normal Osprey Hydraulics bladder. Before starting, I put the same amount of water in each and added the same amount of ice cubes to chill the water. Then, every 20 minutes or so, I drank from each, and after about an hour, the water from the insulated pack was noticeably colder than from my uninsulated pack. This continued for the next few hours. After about 6 hours, the difference wasn't as noticeable by the end of the walks.
From my testing, they kept the water warmer in the cold and colder in the warmth, but that did come with a few downsides. The pack is heavier because of the insulated sleeve. Because of the additional sleeve bulk, the pack would not slide into the hydration slot on my rucksack, so I had to put it in the main body.
Whilst there was a plug-n-play connect system, I had trouble sometimes doing this without some water coming out as you had to fiddle with it in the small window at the bottom of the pack. Drinking was easy through the bite valve, which self-sealed after each sip. You can take the reservoir out for cleaning and flip it inside out to make the cleaning a breeze, and it is also dishwasher-friendly if you follow the manufacturer's instructions. The downside of the insulated tube is that you cannot see inside it like normal clear tubes, so make sure you empty the tube fully after each walk and regularly use a tube cleaning kit. You could swap out the tube, though, for a regular one if compatible if you wish, as many brands are interchangeable.
Overall, if you want to prevent your water from freezing or keep your drinks cool in summer, this insulated Hydrapak Hydrasleeve is undoubtedly the way to go.
As with other equipment tests, for a budget option, I again searched on Amazon for hiking reservoirs and bladders for their biggest sellers, with thousands of positive reviews. This time, the search came up with the Joyhill Hydration Bladder, which, when I purchased it, was only £13.60 for the 3-litre version... the 1.5-lire and 2-litre were cheaper than that! Joyhill may be a brand that you have never heard of... I certainly hadn't, but I was pleasantly surprised at what you got for your money, and I would recommend it as a budget buy.

|
|

Specs:
Features:
Pros:
Cons:
Description:
Okay, so this may not be as durable, well-made, or easy to use as all the others on this list, but it does a job and is around a quarter of the price of most of them, so it is my choice of a budget buy. They advertise that it can be used for hiking and biking.
On the plus side, it does what it says on the tin... it is a hydration bladder, it is BPA free, there is a wide slider opening for filling and emptying, there is a double solder seal around the side for added durability, a pull on/off on the mouthpiece to stop leaks and a dustproof cover. So, if you are looking for something that does a job at a low price, then this hydration bladder is the one.
If you want to pay more and get something more durable and easier to use, look at the other options on this list. Out of the packet, you can feel that the build quality isn't the same as the others on this list. The bite valve isn't as easy to use; it is not as soft in your mouth and feels slightly plasticky.
The quick-release system for removal for filling that the others have isn't there, but that said, it isn't too much extra effort to take the whole thing off your backpack or hydration pack for filling. While I had no issues with leaks while I was testing, the material did not feel as durable and stretchable as the others. That said, it says it won't leak out with up to 70 kg of pressure, but I did not try jumping it, being over 70 kg! According to their wording on Amazon, they also offer a two-year warranty.
It was reasonably easy to clean with the wide opening but was not fully reversible. There was a bit of an aftertaste on the first couple of uses, but that was solved with my lemon juice and freezing trick that I outline below in the care and maintenance of hydration bladders. If you choose the suitable capacity, it will fit in most rucksacks and hydration backpacks.
Overall, if you are looking for a budget hydration bladder, you cannot go too far wrong with this. However, if you have the money to spend more, you may prefer the other easier-to-use and more durable hydration reservoirs in this guide.
There are not too many hydration reservoirs with built-in water filters, as many people just use a separate water filter system alongside their hydration packs. If you want a combined hydration reservoir and water filter, you cannot go wrong with this Camelback Crux reservoir filtered by LifeStraw.

|
|

Specs:
Features:
Pros:
Cons:
Description:
If you know you will need to refill on the way around your hike, or if you are off on a multi-day walk and will replenish your water supply on the way around, you need to ensure the water you fill the reservoir with is safe to drink. You can add water-purifying tablets, but a water filter is the best way to remove particles and bacteria and other nasty substances lurking in the water.
You can buy and use many water filters alongside your hydration bladder, but this one from Camelbak is built-in. The reservoir is basically the Crux I reviewed above, but this time with an integrated LifeStraw water filter.
The kit passes 2 litres of water through two complete filtration stages. In the first stage, the hollow fibre filter membrane removes 99.9999% of bacteria (E. coli, etc.), 99.999% of parasites, and 99.999% of microplastics. In the second stage, the activated carbon filter reduces foul odours, lead, chlorine, and other chemicals.
The hydration reservoir, much like the Crux above, is designed for durability and ease of use. This makes it convenient for those who prefer a built-in water filter with their hydration reservoir, enhancing your outdoor experience.
It is essential to stay hydrated. In the UK, the NHS's Eatwell guide recommends drinking eight glasses of water or fluid per day to stay hydrated. When you exercise (walking or hiking), the need for drinking increases as you need to keep hydrated. Not drinking enough can lead to dehydration, which can lead to many health problems, including heatstroke, fatigue, muscle cramps and visibility issues.
Drinking plenty of water before, during, and after your walk is the best way to avoid this and stay hydrated. You should drink before you feel thirsty, and the best way to drink water is little and often, as outlined in the article. Using a water bladder is a good way to drink water without having to keep stopping for your water bottle. You lose additional minerals and salts from your body when you sweat, so putting hydration tablets in your water can also help stop you from feeling the effects of dehydration. You should also carry some rehydration salts or tablets in your first aid kit. If you add tablets to your bladder, many have markings so you can add the correct number of tablets for the fluid.

Detailed markings for volume levels on a hydration reservoir
How much water you need varies from person to person, depending on the length/intensity of your walk, your age, the weather, your sweat rate, and your body type. A good starting point is generally about 500 ml of water per hour, walking at an average speed in moderate temperatures. In warmer weather, when walking up hills or at a faster pace, staying hydrated will increase that need. A lot is based on judgement; you know your body the best, so the more you go out walking, the more you'll work out just what amount of water your body needs. Using a bladder or water bottle is an easy way to keep hydrated on the go.
You can overdo it, though, by drinking too much water. When you drink too much water, your kidneys can't get rid of the excess water, and the sodium content of your blood becomes diluted. This is called hyponatremia, and it can be life-threatening.
For me, hydration bladders or hydration reservoirs, as they are sometimes known, have been a bit of a game-changer whilst out walking and hiking. I drink a lot of fluid while out and about, and the constant stop/start of having to reach for a bottle or remove my rucksack to access my drinks was a bit of a pain. That all stopped when I was converted, quite a few years ago now, to the hydration bladder. There are a few potential downsides that I'll get on to later, but for me, the hydration bladder is an essential part of my hiking kit.
Hydration bladders or water bladders are flexible water reservoirs designed for hands-free drinking during outdoor activities, providing a convenient and easy way to access water flowing through the system. These reservoirs typically feature a hose with a bite valve, allowing you to sip water without taking your hands off your gear or stopping to grab a bottle. They come in various capacities, generally from 1 to 3 litres, with various opening/fill types and features. Larger ones are available that are more suitable for camping and water storage.

Hydration bladder
For hiking, many rucksacks or backpacks over 20 litres have a pocket in which you can store the water bladder or a specialised hydration compartment with an opening for the hydration tube. If it doesn't, you can still store the hydration bladder in your main backpack compartment but take note that this will reduce the remaining storage space. There are also hydration packs available that are generally smaller and come with an included bladder.
With the different designs, capacities, ease-of-use and compatibilities, there is a hydration bladder these days for just about every need.
For me, this is simple: a bladder effectively provides hands-free access to your drink without having to keep stopping to access your water bottle, and I personally find it easier to drink from. For me, they are one of my hiking essentials.
The capacities of many of them are much higher than those of water bottles. As the tube is in sight, it is a reminder to sip as you go rather than keep forgetting to drink. They slip easily inside hydration packs and backpacks. The only downside I sometimes find on hot days is knowing when they are nearly empty. So, I generally also carry a 500 ml water bottle around with me as well.

Hydration tube passing through loops on shoulder straps of a backpack
When selecting a hydration bladder or hydration reservoir, you should consider factors such as:
Below, we run through the main considerations and features when choosing your hydration bladder.
Hydration bladders come in various capacities, typically ranging from 1 to 3 litres, but I have seen ones up to 6 litres. You are in the best position to know your own body and its hydration needs, so you are the best guide to this one as to what capacity you need.
When you are walking or hiking, your body will need more water or fluid than when stationary. You need more fluid as you exercise, and if you are outside and it is warm, you may sweat, so again, you need more fluid. Also, if it is a short walk, the fluid need will be much less than for a long walk, and on warm days, you'll need more than walking in cold weather. Over time, you should become more adaptable at judging your own needs. I always try to ensure I'm well-hydrated before I set off.

Teardrop-shaped hydration pack
I mainly use a 3-litre water reservoir, which I always fill on walks longer than three hours. For walks shorter than that, I part-fill it. I know I drink more than some of my fellow hikers, so your need may be less than that. The majority of them use 2-litre water bladders.
The other point to remember is that whilst there are many lightweight water bladders around, the lightweight water bladders weigh far less than the fluid they carry. The average 2-3 litre hydration bladder weighs around 250 grammes, but just 1 litre of water weighs 1 Kg or 1,000 grammes. Basically, any fluid you are drinking, such as water-based, will weigh this much as the density of water is approximately 1 gram per cubic centimetre, so 1 litre weighs 1 Kilogram.
Weight of fluid for various capacities of hydration bladders
| Capacity (litres) |
Weight of fluid (g) |
Weight of fluid (Kg) |
|---|---|---|
| 0.5 | 500 | 0.5 |
| 1 | 1,000 | 1 |
| 1.5 | 1,500 | 1.5 |
| 2 | 2,000 | 2 |
| 2.5 | 2,500 | 2.5 |
| 3 | 3,000 | 3 |
So, whilst you may look for the best lightweight water bladders, the few grams difference between them all makes little difference when
compared to the weight of the water within it once you start carrying more water. For a full 3-litre bladder, the bladder itself makes up less
than 10% of the total weight of bladder + fluid.
If you use a part-filled bladder so there is air in the top part, and the water makes annoying sloshing sounds as you walk, then you could try turning the water bladder upside down before you start and suck/draw out the air first via the drink tube, so the water doesn't sound like it is sloshing around.
To circumvent this, if you feel carrying that much weight is too much, if you know you are passing water sources (flowing streams, etc.), you can refill en route. However, if you do, I would strongly recommend treating the water with water-purifying tablets or using a water filter/purifier, as you cannot tell whether a water source is safe to drink from simply by looking at it.
Whilst 1 to 3-litre water bladders are the norm from a size point of view, you can get 6-litre or 10-litre ones that are generally best used for groups or camping when you can fill them when you reach your destination. You could even use specific attachments to take a shower!
Material and durability play an essential role in choosing the right hydration bladder. Hydration bladders are typically made from robust, BPA-free plastic, which is intended to last for a long time if handled with care. Many are made from TPU (Thermoplastic Polyurethane), whose properties allow the plastic to be used in a wide range of goods. It is flexible, can be combined with other plastics and is strongly resistant to tears and abrasions.
Adding other plastics and materials to the bladder construction allows for the different thicknesses, colours, stiffness, and stretchiness of the different water bladders. Some are combined with nylon outers for further protection. I've been using them for many years, and I have only had one split seam and one punctured water bladder in all that time, and the puncture was my fault. If they are well looked after and safely stored between uses, they should give many years of use. Some brands even offer a lifetime guarantee.
The drinking tubes are also BPA-free and relatively flavour-neutral. However, you should avoid storing certain flavoured drinks in tubes and reservoirs for long periods, as this can discolour and 'taste' the plastic. Regular emptying after each trip and cleaning (see below) help with this.
One potential downside is that in really cold weather, the fluid in the tube can freeze. Certain materials help prevent this, and insulation systems are also available for some reservoirs and tubes. More on that below in available accessories for water bladders.
Bite valve types vary, with some offering adjustable flow rates, mechanisms for valve shut-offs, and covers for winter use and keeping out dirt.
The various brands mention various flow rates or how quickly the water comes out of the bladder when sucked through the bite valve. Whilst the ones that do offer faster flow rates may suit some people, I found that all these on this list were adequate, and much like hydration reservoir capacity, it will come down to personal preference as to how quickly you want the flow rate to be.
Leaks or accidental leaks from bite valves can happen. Many water bladders, except budget-end ones, have bite valve shut-offs, which stop this from happening. This can be on/off levers, on/off twist lock systems, switch systems or buttons.
Some bite valves have integrated covers, or you can buy one as an additional accessory. They are generally attached to the water tube. They help keep the end clean and free from dirt and help stop the end from freezing in very cold weather.
There are two main types of openings on water bladders - sliders and twist caps, which can influence their ease of use and convenience.

Opening slider
Sliders are typically found on hydration bladders with a wide top opening. The opening is sealed by folding the top edge over and sliding a plastic clip across it to lock it in place. The main advantages of the slider are that the wide opening makes it very easy to fill and empty the bladder; when properly closed, it provides a very secure and leak-proof closure, and the wide opening also allows for easy access to the interior, making cleaning and drying it more straightforward.

Hard plastic at the opening allows for easy pouring
You can generally fit your hand inside, which helps with cleaning, and you can turn some inside out. If you are transferring water out to another container, I always find this is easier done with a slider water bladder than with a twist-cap one.
A potential downside is that over time, the frequent folding and unfolding may wear out the top edge, but these are usually strengthened to mitigate this risk.
The other main type of opening on a bladder is screw or twist caps, which are usually located on the side or top of the water bladder and function similarly to the caps on traditional water bottles, but the difference is you do not drink through them - they are simply there for filling or emptying the hydration reservoir. They are easy to open and close, making them user-friendly and are usually quite durable. The downside is that the opening is smaller than the slider, so filling and emptying the reservoir are slower, making cleaning and drying more difficult. Also, as I have found, some have an O-ring sealer inside, which can perish or become distorted, and there is a risk of cross-threading, so water can slowly leak out.
Whilst the wide opening on a slider water bladder allows faster water entry, you do have to hold the opening open, whereas the opening on a twist cap is always open once you have unscrewed it. Other openings/closures, such as zip-lock style closures, are much less common.
For me, the quick-connect tube is one of the key features of a hydration bladder. With one press of a button, the tube disconnects from the water reservoirs so that the reservoirs can easily be filled, cleaned, or emptied. This saves having to keep undoing your tube from your backpack or tube portal and then refit it. They provide a secure and leak-free connection.

Quick release on hydration reservoir
Different manufacturers call them different things, such as QuikConnect, Plug-n-Play, QuikLink, etc., but they all basically do the same job of allowing the hose to be easily and quickly disconnected from the bladder or reservoir. It also allows tubes to be swapped out and interchanged with other tubes, so you do not have to replace the whole hydration pack if your tube goes.

Hydration tube fed through loops on shoulder strap on backpack
Often, the quick-connect tube attaches at the bottom of the water reservoir, but ones like the Osprey Hydraulics (above) connect at the top of the bladder, which is a plus for me, as it saves you having to feel around in the bottom of your backpack or hydration pack to undo it. The downside is that this bottom bit of the tube does not disconnect for cleaning.
Many newer daypacks or backpacks come with a sleeve that fits a hydration reservoir and are generally marked as hydration-compatible. All you need to know is the maximum capacity size the sleeve will hold, and then you can buy a hydration bladder up to that size. These sleeves are generally sited between the backpack's frame and the main compartment.
If you do not have a backpack with a dedicated hydration sleeve, then the main place to put it is in the main body of your backpack, but then it does decrease the amount of room you have available for other items. If it leaks it could wet other items in your backpack, which is why I always have a dry bag inside mine. A hydration pack's main purpose is to carry water bladders, so if you have one, you just need to know the size your hydration pack will hold.
The final thing to consider is the ease of cleaning water bladders. Leaving fluid in a bladder after a walk is not a good idea. It becomes a breeding ground for bacteria, and if you include anything other than water, it may stain the bladder or the tube. Therefore, always clean the bladder and hose as soon as possible.
Many screw top bladders have quite wide screw tops, so allow a brush in for cleaning. I find sliders easier to clean, though, as they create a wider opening for easier cleaning, and some even are fully reversible and can be washed in a dishwasher.
Hydration packs where all the components come apart are easier to clean, as you can then clean the tube, bite valves, etc., to stop bacteria growth.
Some tubes come with magnets on them. If you connect the other side of the magnet to a sternum strap, the tube will attach to it, stopping it from flopping around while walking.

Magnet to stop hydration tube flopping around

Magnetic catch on hydration tube connected to sternum strap on Osprey backpack
Hydration bladder accessories and customisation options can further enhance your hydration experience, providing added convenience, safety and functionality to your setup. Some examples of these accessories include:
You can buy specific hydration packs, such as the HydraPak HydraSleeve (reviewed above), which has insulation around the reservoir and tube. Insulation around reservoirs and tubes in hydration packs helps maintain water temperature. It helps prevent water from freezing in very cold winter conditions and can keep water colder for longer in hot summer conditions.
A couple of downsides are generally additional weight and bulk, so they take up more space in backpacks, and they can be fiddlier to connect and disconnect the tube to the bladder. You can buy some insulation sleeves separately, just to put them around when you feel you may need them and leave them without for the rest of the time.
Due to the outer insulated layer, they do tend to be more durable as they have that additional layer of protection, so you could maybe strap them to the outside of your backpack if needed, but if you do, they will be more exposed to the elements. Or, as some lightweight water bladders tend not to be as durable, you could use the sleeve to protect them.
To keep water colder for longer in the summer months, I put lots of ice cubes into the reservoir before I set off so these can melt on the walk and provide cool drinks. In winter, when I know the tube is more exposed, and there is a chance of it freezing, I take small sips regularly to keep the water moving along the tube to prevent it from freezing.
On very cold days, I always try to ensure that as little of the hose is exposed as possible. I've never had any issue with reservoirs freezing, as in the main they are more protected in the pack, and if sat in the hydration sleeve, it is just behind my back that is giving off heat. On very, very cold days, if you have issues with your reservoir freezing, you could always leave a hand warmer next to it for some additional warmth. Just ensure that if your hand warmer comes with a pouch, you leave it in the pouch, as some hand warmers can get quite hot.
If you are planning on overnight backpacking or simply on a long hike on a hot day, if you have access to water then there is nothing better than having a shower to get rid of the day's grime and to cool yourself down. Ok, so it won't give you as good a shower as one connected to your mains water at home, but they do work far better than filling a water bottle and squeezing it at yourself!
Various converter kits and hoses are available. Most work better with larger water storage bags or bladders. The black bags work better, as they absorb heat, so you may just get a warm shower rather than one at the same temperature as where you just got the water. Some are classed as camping showers, but you need a gravity-fed one unless you fancy carrying around a pump.
If you are out on longer walks, or multi-day walks, or simply don't want to carry as much water with you, then if you know you are passing a source of water (river, stream, etc.), then you can refill your hydration bladder there. You do not know what contaminants lurk in the water (there are many!) or what may have polluted it further upstream, so you really need to filter the water. Many people use separate water filters and carry them along in their backpacks.
The other alternative is to use an inline water filter built into the tube section of the bladder, which filters the water as you drink it, as with the CamelBak Crux Reservoir filtered by LifeStraw that I reviewed above.
Proper care and cleaning of hydration bladders is necessary for their longevity and to prevent mould and bacteria growth. This involves cleaning, drying, and storing it so that your hydration bladder is in excellent condition for its next outing. When you first buy your bladder, it may have an unpleasant odour and water may taste a little strange, so you do need to clean it before its first use. Also, over time, they can develop unpleasant odours or discolours if they are not frequently cleaned, dried and stored correctly. It is particularly crucial to clean reservoirs after storing any sticky sports or electrolyte drinks in them.
You can purchase cleaning kits, which generally consist of a wide brush for cleaning the main bladder, a narrow long brush for cleaning the tube, and some kind of a hanger for keeping the main body open and apart so that it can air dry. In the first instance, follow the manufacturers' instructions that came with your bladder for cleaning it. If you are only using water in it, then rinsing out after each use in hot or warm water from the tap, emptying and rinsing the tube and then air drying should be enough to keep it clean, but cleaning with some kind of a cleaning solution will do the job better.
For completely reversible bladders, they are often allowed to be cleaned in the top rack of a dishwasher - again, just follow the manufacturer's instructions in terms of setting and temperature to use. For others, use normal dishwashing liquid and hot or warm water to create your cleaning solution, depending upon the cleaning instructions. Three-quarter fill the reservoir with this cleaning solution mixture, and then, using the brush, thoroughly clean the inside of the reservoir. Empty out and rinse several times with hot or warm water until all traces of soap have gone. Then hang to air dry. Some cleaning kits include hangers for this job.
If there is still a smell, there are a few other things to try. Sodium bicarbonate (aka bicarbonate of soda), which you may have in your kitchen cupboard, is a natural deodoriser. You can put some on a damp cloth and wipe the inside of the bladder, or add two tablespoons to a litre of water to create a cleaning solution to put inside the bladder and leave for about 30 minutes. Empty out the cleaning solution and rinse well with hot or warm water from the tap before drying.
You can also try cleaning with lemon juice. Add a quarter of a cup of lemon juice to a litre of water to create another cleaning solution, and again leave it in the bladder before scrubbing with a brush. You can make this mix stronger by adding some bicarbonate of soda, but when you do, ensure the bladder is over a sink as you get a bit of a fizzy reaction - like one of the old-school chemistry experiments! Again, rinse well before drying. Every so often, as it is hard to completely dry all the water out of the bladder and tube, I do pop mine in my freezer just to kill off anything that may still be lurking inside any harder-to-clean nooks and crannies.
To clean the tube, when you have one of the above cleaning solutions in the bladder, hold it up above a sink and pinch the bite valve so that water flows down the tube. Then, scrub the tube with one of the thin, long cleaning brushes. Again, always rinse with warm or hot water a few times.
Proper drying and storage are essential to prevent mould growth and maintain the integrity of your hydration bladder. For drying the bladder:
Hydration packs are packs that are principally designed to carry water and come with removable hydration bladders. When looking for a hydration pack, you need to consider your intended activity and the capacity of the hydration pack that you need. Hydration packs do generally have space for a few extras and are often used by runners and cyclists. If the size is big enough, most of the hydration bladders in this list will fit in a hydration pack. Hydration packs generally come in two types: hydration backpacks and hydration waist packs. The hydration backpacks have the reservoir included inside, whereas the waist packs often come with a water bottle.
Backpacks, as typically worn when hiking, generally have a much larger capacity than hydration packs, have additional features, and can carry more weight. Many backpacks and daypacks are now constructed with an interior sleeve where the hydration reservoir can sit. These are often marked as hydration-compatible backpacks.

Back of a hydration pack with a small amount of storage
There are many types of hydration packs available for biking, running and many other outdoor sports. Biking hydration packs are generally compact and low profile, so they do not make riders unsteady and do not create lots of wind resistance. There are other hydration packs designed specifically for runners, some of which are called running vests, whilst others are called running backpacks.

Hydration pack with some additional storage and hip pockets
In conclusion, hydration bladders are an essential piece of gear for outdoor enthusiasts, providing hands-free hydration and convenience during various activities. By understanding the different types, features, and accessories available, as well as proper care and maintenance techniques, you can choose the perfect hydration bladder for your needs. So, gear up with the right hydration bladder and make every adventure a refreshing and enjoyable experience.
Happy walking...
Hydration bladders for hiking typically have a capacity range of 1 to 3 litres, so that you can find the right size for your needs. There are larger capacity hydration bladders, 4 to 10 litres, but due to their weight when filled, these are mainly carried empty and then used and filled at overnight camps.
Soak your hydration bladder with a mix of warm water and dish soap, then use a brush to scrub away dirt and grime. Rinse thoroughly with hot water and let it dry, ideally on a hanger, before storing for best results. More details on cleaning are above.
Insulated tubes for hydration bladders provide key benefits, such as keeping water cool in hot weather, and they help prevent freezing in cold conditions, making them perfect for outdoor activities.
Quick-disconnect fittings make using hydration bladders a breeze, allowing you to easily clean and refill the bladder without having to remove the entire hose. You simply press the button on them, and the tube disconnects, so you can remove the reservoir for refilling or emptying without having to remove the tube from your backpack or hydration pack.
Clean the bladder thoroughly. Then, mix together lemon juice and water and let that sit in the bladder for a while before rinsing. The lemon juice generally removes any plasticky taste.
July 2024